TOASTED RECIPES
Where ideas are warm, crisp, and ready to serve! 🍞
BEST CATEGORIES
TRENDING
![The Ground Beef and Potato Taco Bowl is simple to make with fresh ingredients. Here’s what you need: - 1 lb ground beef - 2 large potatoes, diced - 1 tablespoon olive oil - 1 small onion, chopped - 2 cloves garlic, minced - 1 tablespoon taco seasoning - 1 can (15 oz) black beans, drained and rinsed - 1 cup corn kernels (fresh or frozen) - 1 cup diced tomatoes (canned or fresh) - 1 cup shredded cheese (cheddar or Mexican blend) - 1 avocado, diced - Fresh cilantro for garnish - Salt and pepper to taste - Sour cream or Greek yogurt for serving (optional) These ingredients come together to create a hearty meal. Each item plays a role in the flavor. For example, the potatoes add comfort, while the taco seasoning gives a kick. Understanding the nutritional value helps you make better choices. Each serving has approximately: - Calories: 450 - Protein: 25g - Carbohydrates: 40g - Fats: 20g This meal packs in protein from the beef and beans. It also offers good carbs from the potatoes and corn. Healthy fats come from the avocado and cheese. You can enjoy a filling dish that works for lunch or dinner. For the full recipe, check the [Full Recipe]. 1. Heat olive oil, sauté onions and garlic: Start by heating 1 tablespoon of olive oil in a large skillet over medium heat. Add 1 small chopped onion. Sauté for about 3 to 4 minutes until the onion is soft and clear. Then, add 2 minced garlic cloves and cook for 1 more minute. This step brings out the nice flavors. 2. Brown the ground beef and season: Next, add 1 lb of ground beef to the skillet. Break it apart with a spatula as it cooks. Stir it often for about 5 to 7 minutes until it turns brown. Season with salt, pepper, and 1 tablespoon of taco seasoning. Mix it all together well to coat the beef evenly. 3. Boil and prepare the potatoes: While the beef cooks, fill a pot with salted water and bring it to a boil. Add 2 large diced potatoes. Boil for 10 to 12 minutes until the potatoes are soft enough to poke with a fork. Drain them and set them aside. 1. Adding beans, corn, and tomatoes: Once the beef is ready, stir in 1 can of drained black beans, 1 cup of corn, and 1 cup of diced tomatoes. Let everything cook together for about 2 to 3 minutes. This warms up the beans and corn nicely. 2. Folding in the potatoes: Gently fold the drained potatoes into the beef mixture. Mix carefully so you don’t mash the potatoes. Taste the mixture and add more seasoning if it needs it. 1. Plating the taco bowl: Take bowls and spoon the beef and potato mixture into them. Make sure to fill them well. 2. Toppings and garnishes: Top each bowl with 1 cup of shredded cheese and 1 diced avocado. Finish with a sprinkle of fresh cilantro. If you like, add a dollop of sour cream or Greek yogurt on top for extra creaminess. This Ground Beef and Potato Taco Bowl is ready to enjoy. For the full recipe, check out the details provided above. - Ensuring perfectly cooked potatoes: Start with fresh potatoes. Dice them into equal sizes for even cooking. Boil them for 10-12 minutes until fork-tender. Drain and set aside to keep them fluffy. - Best practices for browning ground beef: Use a large skillet over medium heat. Break the beef apart with a spatula. Stir often to ensure even browning. This method keeps the beef juicy and flavorful. - Additional spices to consider: Add cumin or smoked paprika for a warm taste. A pinch of cayenne can kick up the heat. Experiment to find your perfect blend. - Optional ingredients for extra flavor: Mix in jalapeños for spice or bell peppers for sweetness. Consider adding lime juice for a fresh burst or olives for a briny touch. - Ideal pairing suggestions: Serve the taco bowl with tortilla chips or a simple salad. A side of rice works well, too. These pairings add variety and balance to your meal. - Portion control for meal prep: Use bowls with clear measurements. Fill each bowl evenly to help with portion sizes. This way, you can enjoy this dish throughout the week without overeating. For the full recipe, check the details below! {{image_2}} You can switch out the ground beef for leaner meats. Turkey or chicken works well. They both cut down on fat but keep the flavor. If you want a vegetarian or vegan option, try using lentils or black beans. They provide protein and fiber, making your meal hearty. Change up your taco seasoning to create new flavors. You can use a spicy blend for heat or a milder mix for a gentle taste. You can also explore Southwest or Mexican flavors. Southwest flavors may include chipotle or smoked paprika, while Mexican flavors often feature cumin and oregano for depth. You can serve this dish as a taco bowl or in a burrito style. In a burrito, you wrap all the fillings in a tortilla. If you want a low-carb option, try using lettuce wraps instead. They are fresh and crunchy, adding a nice twist to the meal. For the full recipe, check out the Ground Beef and Potato Taco Bowl 🥔. To store leftovers, let your taco bowl cool first. Place it in an airtight container. This keeps it fresh and tasty. When stored properly, the taco bowl lasts about 3 to 4 days in the fridge. Always check for any signs of spoilage before eating. Freezing your taco bowls is easy. First, let them cool completely. Then, transfer the bowl to a freezer-safe container. Be sure to leave some space for expansion. Your taco bowl can stay in the freezer for up to 3 months. When you’re ready to eat, thaw it overnight in the fridge. Reheat it in the microwave or on the stove until hot. For the best flavor after storage, reheat your taco bowl gently. Use low heat on the stove or a microwave on medium power. Stir it often to ensure even heating. Always check that the food reaches at least 165°F to ensure it is safe to eat. Enjoy your hearty meal just like the first time! How to make Ground Beef and Potato Taco Bowl? To make this dish, follow these steps: 1. Heat 1 tablespoon of olive oil in a large skillet. 2. Add 1 small chopped onion and sauté it for 3-4 minutes. 3. Stir in 2 minced garlic cloves and cook for another minute. 4. Add 1 lb of ground beef and cook until browned, about 5-7 minutes. 5. Season with salt, pepper, and 1 tablespoon of taco seasoning. 6. In a pot, boil 2 diced large potatoes for 10-12 minutes until fork-tender. 7. Once the beef is cooked, mix in 1 can of black beans, 1 cup of corn, and 1 cup of diced tomatoes. 8. Fold in the drained potatoes. 9. Serve in bowls, topped with 1 cup of shredded cheese, diced avocado, and fresh cilantro. For the full recipe, check out the main article. What can I substitute for ground beef? You can use ground turkey, chicken, or even plant-based meat. Each option offers unique flavors. If you prefer a vegetarian option, try black beans or lentils. They add great texture and protein. Is this recipe gluten-free? Yes, this recipe is gluten-free. All the ingredients, like potatoes, beans, and spices, do not contain gluten. Always check labels for any packaged products to ensure they are gluten-free. Can I make this recipe dairy-free? Yes, you can make this dish dairy-free. Simply omit the cheese and use dairy-free sour cream or yogurt. You can still enjoy great flavor without dairy. How can I make this ahead of time? You can cook the beef and potato mixture a day in advance. Store it in an airtight container in the fridge. Reheat it on the stove or in the microwave before serving. What are the best storage options for meal prepping? Use glass or plastic containers with tight lids. This keeps the food fresh. You can also freeze portions for later use. Just remember to label the containers with dates for easy reference. In this blog post, we covered how to make a tasty Ground Beef and Potato Taco Bowl. We explored key ingredients and shared step-by-step cooking instructions. I provided helpful tips on cooking, flavor enhancements, and serving suggestions. We also discussed possible ingredient variations and how to store leftovers safely. Remember, cooking should be fun and flexible. Enjoy mixing flavors and making this dish your own. You can create a healthy meal that suits your taste!](https://toastedrecipes.com/wp-content/uploads/2025/05/9ccbe94c-8edf-4df7-9fee-2f883862ec2a.webp)
. 1. Preheat your oven to 350°F (175°C). Grease and flour a 15x10-inch sheet pan. 2. In a large bowl, whisk together: - 2 cups all-purpose flour - 2 cups granulated sugar - 1 teaspoon baking soda - 1/2 teaspoon salt 3. In a medium saucepan, melt 1 cup unsalted butter over medium heat. Stir in 1 cup water and 1/2 cup unsweetened cocoa powder. Bring to a boil, then remove from heat. 4. Pour the warm chocolate mixture into the flour mixture. Stir to combine well. 5. In a small bowl, whisk together: - 1/2 cup buttermilk - 2 large eggs - 1 teaspoon vanilla extract 6. Add the wet ingredients to the dry mix. Stir until you have a fully mixed batter. 7. Pour the batter into the prepared sheet pan. Spread it evenly and bake for 20-25 minutes. A toothpick should come out clean when done. 8. While the cake bakes, prepare the frosting. In a saucepan, melt 1/2 cup unsalted butter over medium heat. Stir in 2/3 cup unsweetened cocoa powder until smooth. 9. Remove from heat and add: - 3 cups powdered sugar - 1/3 cup milk - 1 teaspoon vanilla extract Whisk until creamy. 10. Once the cake is done, let it cool for 10 minutes. While warm, pour the frosting over the cake. Spread it evenly. Allow the cake to cool completely before slicing. For more detailed instructions, refer to the Full Recipe. - Ensuring proper oven temperature: Always preheat your oven to 350°F (175°C). An accurate temp is key for a perfect cake. Use an oven thermometer if you doubt your oven's heat. - Checking for doneness: After 20 minutes, check your cake with a toothpick. Insert it into the center. If it comes out clean, your cake is ready. If not, give it a few more minutes. - Adjusting for altitude: If you live in a high-altitude area, you may need to tweak your recipe. Reduce baking soda slightly and add a bit more flour. This helps your cake rise properly. - Achieving creamy consistency: For a smooth frosting, melt the butter first. Whisk in cocoa powder until it blends well. Then add powdered sugar and milk slowly. This mix will make the frosting creamy and easy to spread. - Tips for spreading frosting evenly: Use a spatula to spread the frosting. Start from the center and move outward. A turntable can help you get an even finish. - Serving suggestions for gatherings: Cut the cake into squares and place them on a large platter. This makes it easy for guests to grab a piece. You can serve it with a scoop of vanilla ice cream for a treat. - Decorating tips for added flair: Add some chocolate shavings or sprinkles on top for a fun look. Fresh berries can contrast nicely with the chocolate. This adds color and flavor to your dessert. For a detailed recipe, you can refer to the Full Recipe. {{image_2}} To make your cake even more special, try adding instant coffee. This will give deep flavor to the chocolate. Just one or two teaspoons can make a big difference. You can also switch up the frosting. Use cream cheese frosting for a tangy twist. Or try a peanut butter frosting for a nutty flavor. If you need a gluten-free option, almond flour works great. It adds a nice nutty taste and keeps the cake moist. For a vegan cake, replace butter with coconut oil. You can use flax eggs instead of regular eggs. Just mix one tablespoon of flaxseed meal with three tablespoons of water for each egg. This cake shines when served with ice cream. Vanilla or coffee ice cream pairs well with the rich chocolate. You can also get creative with toppings. Add chopped nuts for crunch or colorful sprinkles for fun. Fresh berries can also add a nice touch and balance the sweetness. Store leftover Chocolate Texas Sheet Cake in a tight container. Use an airtight container to keep it fresh. If you do not have one, wrap it well with plastic wrap. This keeps the cake moist and tasty. You can store it at room temperature for a day or two. For longer storage, put it in the fridge. To freeze the sheet cake, cut it into squares. This makes it easy to thaw only what you need. Wrap each square in plastic wrap. Then, place them in a freezer bag or container. This helps prevent freezer burn. When you want to enjoy a piece, take it out and place it in the fridge overnight. This way, it thaws slowly and keeps its texture. The Chocolate Texas Sheet Cake stays fresh for about 3 to 4 days at room temperature. In the fridge, it can last up to a week. Look out for dry spots or an off smell, which means it has spoiled. If the frosting looks hard or changes color, it’s best to toss it. For the best taste, eat it fresh! This cake stands out due to its rich, deep chocolate flavor. The use of unsweetened cocoa powder brings a bold taste. I also add buttermilk, which gives the cake a lovely moist texture. The balance of sugar and cocoa creates a sweet yet not overpowering dessert. Many people in my cooking classes rave about this recipe. It has a high rating among home bakers and professionals alike. The cake is easy to make and yields a large portion, perfect for gatherings. Yes, you can prepare this cake in advance. I recommend baking the cake a day before your event. Let it cool completely and store it in an airtight container. This helps keep it moist and fresh. For the frosting, you can make it a few hours ahead. Just store it in the fridge. When you're ready to serve, let the frosting sit at room temperature before spreading it on the cake. You can tell the cake is done when it's springy to touch. It should not look wet on top. The edges may pull slightly from the pan too. To be extra sure, use a toothpick. Insert it in the center of the cake. If it comes out clean or with just a few crumbs, the cake is ready. This method is simple and very reliable for all cakes. This blog post covered every step to make a great Chocolate Texas Sheet Cake. We discussed key ingredients, essential baking steps, and helpful tips to ensure success. I shared ways to personalize your cake with flavor variations and dietary options. Lastly, I included storage tips to keep your cake fresh. Remember, baking is both a science and an art. Enjoy experimenting and sharing your delicious results!](https://toastedrecipes.com/wp-content/uploads/2025/05/db8430da-0f6a-4a7c-af54-6ad4f1ba13f9.webp)

![- 1 cup creamy peanut butter - 1/2 cup unsalted butter, softened - 1/2 cup granulated sugar - 1/2 cup brown sugar, packed - 1 large egg - 1 teaspoon vanilla extract These essential ingredients form the base of our Peanut Butter Cup Stuffed Cookies. Creamy peanut butter gives a rich flavor, while unsalted butter keeps the cookies soft. Granulated and brown sugars add the perfect sweetness and moisture. The egg helps bind everything, and vanilla extract adds a lovely aroma. - 1 1/2 cups all-purpose flour - 1/2 teaspoon baking soda - 1/4 teaspoon salt The dry ingredients play a vital role in structure. All-purpose flour creates the cookie's body. Baking soda helps them rise, making them light and fluffy. A pinch of salt enhances all the flavors. - 1 cup mini chocolate peanut butter cups, unwrapped - Sea salt for sprinkling (optional) The star of the show is the mini chocolate peanut butter cups. These sweet bites melt in the center, bringing joy to every bite. A sprinkle of sea salt on top adds a nice touch, balancing the sweetness and enhancing flavor. For the complete recipe, check out the Full Recipe section. - Preheat your oven to 350°F (175°C). Line a baking sheet with parchment paper. - In a large bowl, mix creamy peanut butter, softened butter, granulated sugar, and brown sugar. Use an electric mixer on medium speed until smooth. - Add one large egg and one teaspoon of vanilla extract to the mixture. Beat until well mixed. - In a separate bowl, whisk together 1 1/2 cups of all-purpose flour, 1/2 teaspoon of baking soda, and 1/4 teaspoon of salt. Gradually add this dry mix to your wet ingredients. Stir until just combined. - Cover the dough with plastic wrap and chill it in the fridge for about 30 minutes. This makes it easier to handle. - Once chilled, scoop a tablespoon of dough and flatten it slightly in your hand. Place one mini chocolate peanut butter cup in the center. Wrap the dough around it and roll into a ball. Repeat this for the rest of the dough and cups. - Place the cookie balls on the prepared baking sheet, keeping them about 2 inches apart. - Optionally, sprinkle a pinch of sea salt on each cookie. Bake for 10-12 minutes until the edges are golden and the centers look soft. - Let the cookies cool for 5 minutes on the baking sheet, then transfer them to a wire rack to cool completely. For the full details, check the [Full Recipe]. Chilling the dough is key for great cookies. It firms the dough, making it easier to shape. When the dough is cold, the cookies keep their form while baking. This helps avoid flat cookies that spread too much. Aim to chill the dough for at least 30 minutes. To ensure soft, chewy centers, do not overbake the cookies. They should be slightly golden on the edges, while the center remains soft. This gives that perfect melt-in-your-mouth texture. Remember, cookies will continue to cook on the baking sheet after you pull them out of the oven. Serve these cookies on a tiered cake stand. This creates a beautiful display that guests will love. You can also drizzle melted chocolate over the cookies for a touch of elegance. Sprinkle crushed peanuts on top for extra crunch and visual appeal. For a fun twist, try adding colorful sprinkles or edible glitter. These small touches make the cookies even more inviting. One common mistake is overmixing the dough. This can lead to tough cookies. Mix until just combined for the best results. Another mistake is not cooling the cookies properly. Let them sit on the baking sheet for five minutes before moving them to a wire rack. This helps them firm up and prevents breakage. Proper cooling is crucial for maintaining their shape and texture. For the full recipe, check out the Peanut Butter Cup Stuffed Cookies section above. {{image_2}} You can switch up the flavors in these cookies. Use crunchy peanut butter instead of creamy. It adds a fun texture and a nutty bite. You can also add chocolate chips to the dough. This boosts the chocolate flavor and makes each cookie even more decadent. Imagine biting into a soft cookie with creamy peanut butter and melting chocolate. It’s pure bliss! If you need gluten-free cookies, use almond flour or coconut flour. Both work well and taste great. You can also make these cookies vegan. Substitute the egg with a flax egg or applesauce. For butter, use coconut oil or a vegan butter. These swaps keep the taste yummy and the texture soft. Get creative with the stuffing! Try different candies like caramel or white chocolate. Each candy brings a unique flavor. You can also use different nut butters. Almond butter or cashew butter works well. Each option gives the cookie a new twist. Don't be afraid to experiment! For the full recipe, check out the details above and enjoy baking these delightful treats! To keep your Peanut Butter Cup Stuffed Cookies fresh, store them in an airtight container. This helps prevent the cookies from drying out. Layer parchment paper between cookies to avoid sticking. I suggest keeping them at room temperature for the best texture. They will stay fresh for about a week. If you want them to last longer, consider refrigeration. However, this may change the texture slightly. You can freeze both uncooked dough and baked cookies. To freeze uncooked dough, scoop cookie balls and place them on a baking sheet. Freeze them for about an hour until firm. Once frozen, transfer them to a freezer-safe bag. Baked cookies can also be frozen. Just let them cool completely first. Then, place them in an airtight container with parchment paper between layers. To thaw cookies, simply leave them at room temperature for about 30 minutes. For baked cookies, you can reheat them in the oven. Preheat your oven to 350°F (175°C) and warm them for about 5 minutes. Enjoy them warm for the best taste and texture. For the full recipe, check out the detailed instructions above. Peanut Butter Cup Stuffed Cookies stay fresh for about 5 days at room temperature. Store them in an airtight container. This keeps them soft and tasty. If you want them to last longer, you can freeze them. They will stay good for up to 3 months in the freezer. Yes, you can use different types of peanut butter cups. Try dark chocolate, white chocolate, or even caramel-filled cups. Each type gives a new flavor twist. You can also mix and match for fun combinations. Just pick your favorite kind and enjoy the new taste! Absolutely! You can prepare the dough in advance and chill it. Just cover it and store it in the fridge for up to 2 days. When you're ready, scoop and bake the cookies. This makes it easy to enjoy fresh cookies without too much work. If your dough feels too sticky, add a bit more flour. Start with a tablespoon at a time. Mix well until it feels easier to handle. You can also chill the dough longer. This makes it firmer and easier to shape into cookies. You can find Peanut Butter Cup Stuffed Cookies at local bakeries or grocery stores. Some stores may have them fresh baked. Check the bakery section or ask the staff. You can also find them at cafés or dessert shops. If you can’t find them, you can always make them at home using the Full Recipe! These Peanut Butter Cup Stuffed Cookies are easy and fun to make. We went through the key ingredients, step-by-step instructions, and useful tips. Remember, chilling the dough helps make softer cookies. Explore variations like crunchy peanut butter or gluten-free options. Store them right to keep them fresh. With these tips, you're ready to bake delicious cookies. Enjoy your tasty treats, and happy baking!](https://toastedrecipes.com/wp-content/uploads/2025/05/432443c2-4433-496b-95da-e14bd5d769c9.webp)
NEW RECIPES
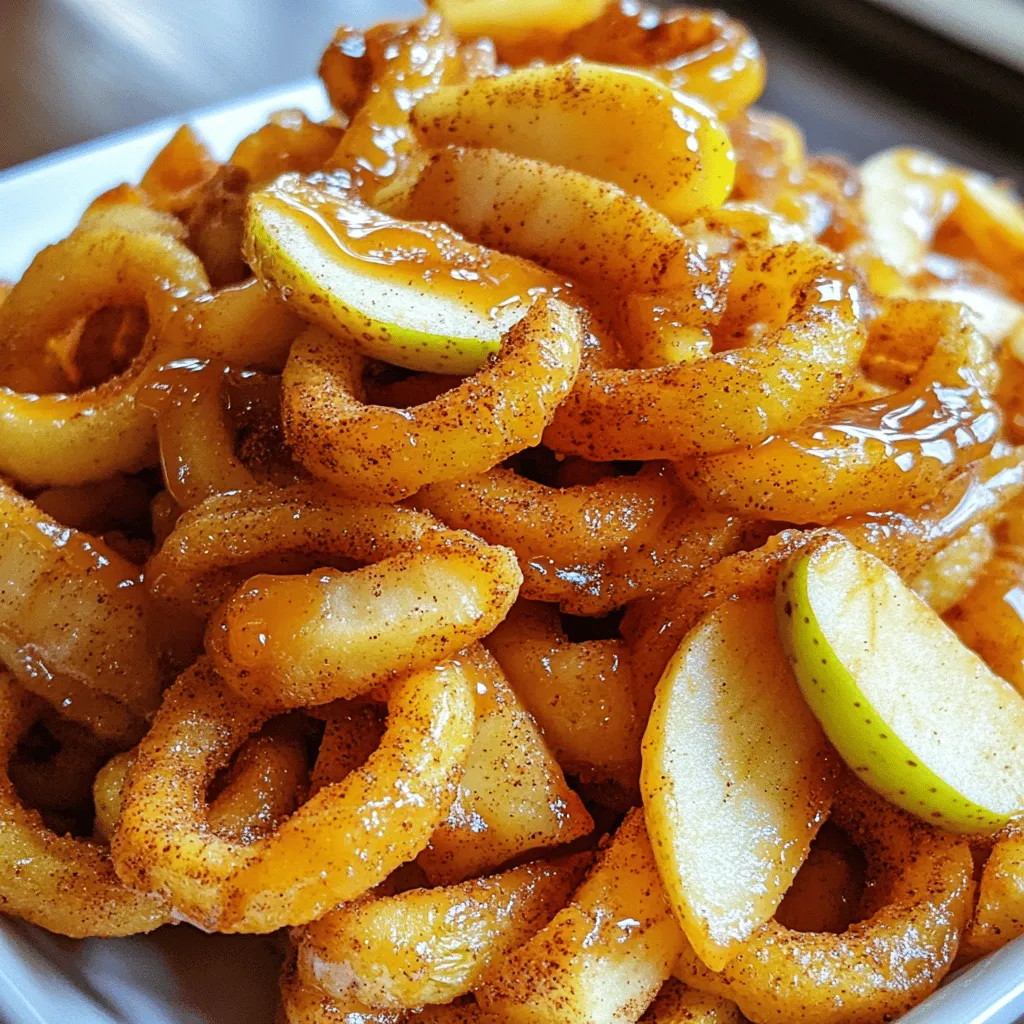
Apple Cinnamon Curly Fries Irresistible Flavor Boost
Are you ready to take your fry game to the next level? Apple Cinnamon Curly Fries combine crispy, golden potatoes with sweet, spiced apples for
![To make Halloween poison apples, gather the following ingredients: - 4 large apples (Granny Smith suggested for tartness) - 2 cups granulated sugar - 1/2 cup corn syrup - 1 cup water - 1 teaspoon vanilla extract - Green food coloring (optional, for a creepy effect) - Edible glitter or black sprinkles (for decoration) - Lollipop sticks or wooden skewers These ingredients work together to create a sweet and spooky treat. The tartness of the Granny Smith apples balances the sweetness of the candy coating. The corn syrup helps the candy stay smooth. The vanilla extract adds flavor, while food coloring gives a fun look. Edible glitter or black sprinkles make the apples festive. For the best results, use fresh apples. Wash them well to remove any wax. The sticks need to be sturdy enough to hold the apples. You can find many of these ingredients at your local grocery store. This is a fun project that kids and adults can enjoy together. For the complete recipe, you can check the [Full Recipe]. - First, wash and dry the apples. Make sure they are clean. - Next, remove any wax coating. Use a cloth to rub them gently. - Now, insert a stick into each apple. Push it halfway through the apple. - In a medium saucepan, mix the sugar, corn syrup, and water. - Heat the mixture over medium heat. Stir until the sugar fully dissolves. - Bring the mixture to a boil without stirring. Watch closely as it heats. - Use a candy thermometer here. You want it to reach 300°F, the hard crack stage. - When it reaches 300°F, take it off the heat. Stir in the vanilla extract. - Want it green? Add a few drops of green food coloring and mix well. - Quickly dip each apple into the candy mixture. Tilt the pot if needed. - Turn the apple to let any extra coating drip off. - While the coating is still warm, add edible glitter or black sprinkles. - This will give the apples an eerie effect and make them fun. - Get a baking sheet ready with parchment paper. Place the apples on it. - Let the apples cool and harden for about 30 minutes. They should set well. For the full recipe, check out the detailed instructions to make your Halloween Poison Apples a spooky treat! When working with hot candy, use caution. The sugar mixture can reach high temperatures quickly. Always keep a close eye on the pot. Use heat-resistant gloves if needed. Make sure kids stay away from the stove. For food coloring, choose safe options. Green food coloring adds a spooky vibe. Just a few drops will do. Mix it well into the candy. This keeps the color even and bright. Timing is key for great results. Dip the apples quickly once the candy reaches 300°F. If you wait too long, the mixture will harden. Use a candy thermometer for accuracy. This tool helps you get the right temperature every time. For the best candy coating, use the right ratios. The mix of sugar, corn syrup, and water is important. Stick to the recipe for a smooth finish. Too much sugar can make it too thick. Too little can make it runny. Make your poison apples stand out! Arrange them on a spooky plate. Use fake spider webs or plastic spiders around them. It adds to the Halloween theme. You can also use a black or orange tablecloth for more flair. Try enhancing with Halloween-themed decor. Add some edible glitter or black sprinkles on top. They make your apples shine and look eerie. The more creative you get, the more fun your treats will be! {{image_2}} You can make your Halloween poison apples even more fun by changing the flavors. Try adding different extracts to the candy coating. For example, almond extract gives a nice twist. Lemon extract adds a fresh taste. You can even mix these flavors! You can infuse flavors while cooking the candy. Just drop in the extract when you add the vanilla. This step adds depth to the sweet coating. The color of your poison apples can be spooky or fun! Start with green food coloring for that classic look. You can also use other food colors like red or purple. Each color gives a different vibe. Want to mix it up? Try layering colors! Dip the apples in one color first, let it set, and then dip again in another color. This creates a cool effect that will wow your guests. Get creative with how you decorate your poison apples. Instead of just edible glitter, you can use nuts or chocolate for toppings. Chopped nuts add a crunchy texture. Melted chocolate gives a rich flavor. You can also use themed decorations for parties. Think spooky eyes made from candy or fun Halloween sprinkles. These little touches will make your apples stand out. Your guests will love the effort you put into making these treats special! To keep your Halloween poison apples fresh, store them in a cool, dry place. A pantry or a kitchen counter works well. Avoid areas near heat sources or sunlight, as these can cause melting. For best results, place the apples in a container with a lid. This helps keep them safe from dust and pests. You can also use a cake dome for added protection. These spooky treats stay fresh for about 3 to 5 days. After that, they may start to soften. Signs of spoilage include a sticky coating and a change in color. If you see any black spots or a mushy texture, it's best to toss them out. You can re-coat leftover apples if they lose their shine. Just melt some more candy coating and dip them again. For storing leftovers, keep them in a cool place in a sealed container. Avoid stacking them, as this can ruin the coating. Enjoy these festive treats while they’re still fresh and fun! To enhance the look of your poison apples, consider these tips: - Use Granny Smith apples for their bright green color. - Add green food coloring to the candy coating. - Sprinkle edible glitter or black sprinkles for a spooky touch. - Place fake spiders or spider webs around the apples for a fun display. Yes, you can use other apples! Each type offers a unique flavor: - Fuji apples are sweet and crisp. - Honeycrisp apples are juicy and balance sweet and tart. - Golden Delicious apples are mild and sweet. Choose apples that are firm to hold the candy coating well. If you need a substitute for corn syrup, here are some options: - Honey adds a rich flavor but may change the color. - Agave nectar is a good alternative that keeps the sweetness. - Brown rice syrup is thicker but can work as well. Each substitute may slightly alter the texture, so keep that in mind. Yes, poison apples are safe to eat! The food coloring is safe in small amounts. Here’s what to remember: - Use food-grade coloring that is safe for consumption. - Avoid using non-food coloring for decoration. The candy coating is made from sugar, water, and corn syrup, making it sweet and fun! The candy coating takes about 30 minutes to harden completely. However, some factors can affect this: - Room temperature: A cooler room helps the coating set faster. - Humidity levels: High humidity can slow down hardening. Once set, your apples will have a nice crunchy shell! Candy-coated apples are a fun treat, especially for Halloween. We covered the ingredients, step-by-step instructions, and safety tips. You learned how to make tasty candy coating and decorate your apples. Experiment with flavors and colors to create your own twist. Remember to store them properly for the best taste. These sweet, spooky apples can be the highlight of any party. Enjoy your candy-making adventure!](https://toastedrecipes.com/wp-content/uploads/2025/07/7e1c62c8-34e3-47f8-883f-8e6c825dde42.webp)
Halloween Poison Apples Recipe Tasty and Fun Treats
Get ready to impress your friends with a fun Halloween treat: Halloween Poison Apples! These spooky snacks are easy to make and look stunning on

Blender Salsa Fresh and Flavorful Recipe Guide
Are you ready to spice up your meals? This Blender Salsa Fresh and Flavorful Recipe Guide will transform your cooking. With just a few fresh
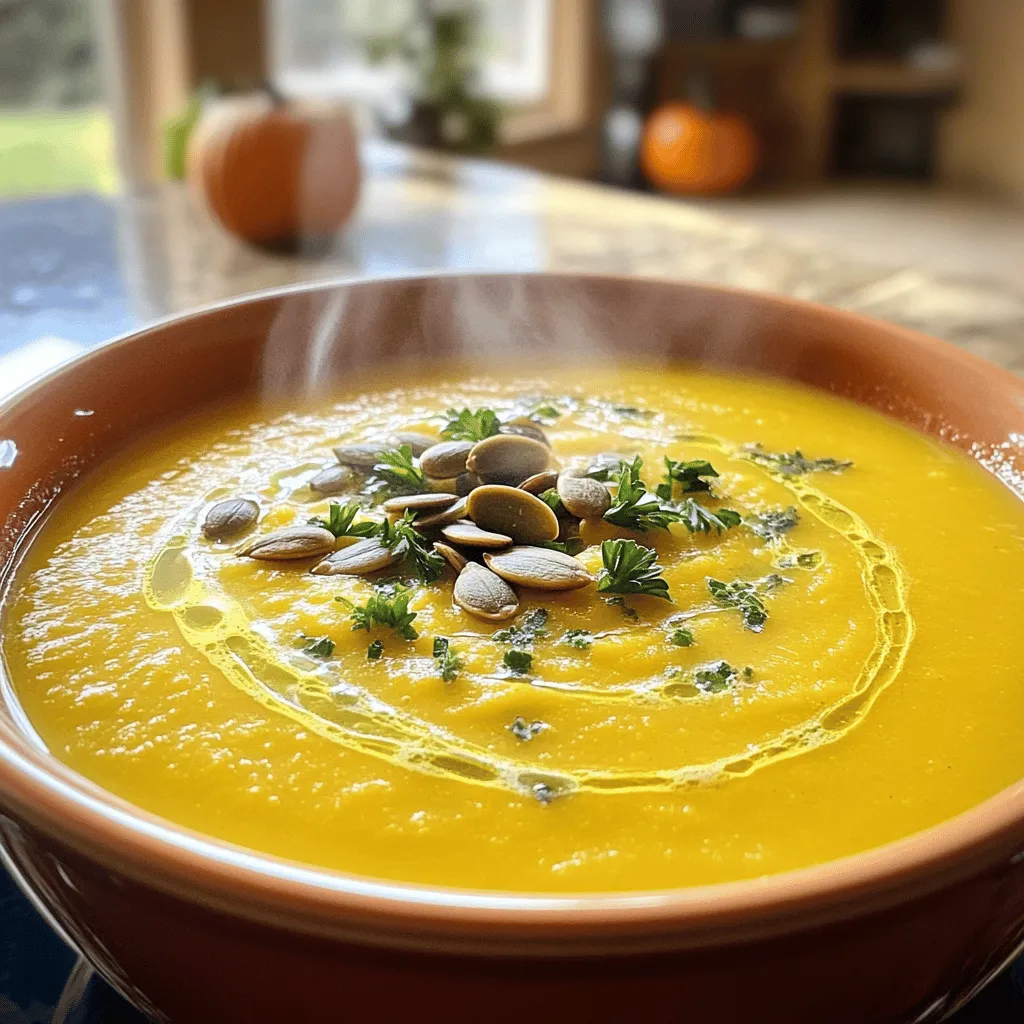
Fall Soup Recipes to Warm Your Soul Delightfully
As the leaves turn and the air cools, nothing comforts like a warm, hearty soup. In Fall Soup Recipes to Warm Your Soul Delightfully, I
![- 1/4 cup fresh orange juice - 2 tablespoons apple cider vinegar - 1 tablespoon Dijon mustard Fresh ingredients make a big difference. I love using orange juice for a sweet and tangy base. The apple cider vinegar adds a nice bite that balances well with the orange juice. Dijon mustard gives the dressing a bit of spice and depth. - 1/4 cup extra virgin olive oil - 1 tablespoon honey or maple syrup Next, let’s talk about oil and sweetener. Extra virgin olive oil adds richness and smoothness. It blends well with the tangy flavors. Honey or maple syrup adds a touch of sweetness. If you want a vegan option, go for maple syrup. - Salt and black pepper to taste - Zest of 1 lemon Seasoning is key to any vinaigrette. I always add salt and black pepper to enhance the flavors. Adding lemon zest brightens the dressing and gives it a fresh taste. This simple step makes your vinaigrette pop! For the full recipe, follow the link to Zesty Citrus Vinaigrette Dressing. Start by picking a medium-sized mixing bowl. Pour in the fresh orange juice. Next, add the apple cider vinegar. Then, spoon in the Dijon mustard. Use a whisk to blend them well. This mix serves as the base of our vinaigrette. The flavors will come alive with this combination. Next, it’s time to add the olive oil. Slowly drizzle the oil into the bowl. Keep whisking as you pour in the oil. This step is key to making the dressing smooth. You want it to blend nicely, creating a creamy texture. If you stop whisking, the oil will separate from the other ingredients. Now, stir in the honey or maple syrup. This adds a touch of sweetness. Whisk again until everything is well mixed. Then, add the lemon zest for a burst of flavor. Finally, season with salt and black pepper to taste. Taste the vinaigrette and adjust if needed. Let it sit for about 10 minutes to let the flavors meld together. For the full recipe, check out [Full Recipe]. To make a great vinaigrette, you need to emulsify it. This means mixing oil and vinegar together so they don't separate. Here are some tips to get it right: - Start with a base: Mix your vinegar and mustard first. This gives the oil something to grab onto. - Add oil slowly: Drizzle in the olive oil slowly while whisking. This helps the oil blend well. - Whisk hard: Use a whisk or a jar with a lid. Shake it well to combine the ingredients. Balancing sweetness and acidity is key to a good vinaigrette. Here’s how to do it: - Taste as you go: After mixing, taste the vinaigrette. If it’s too sour, add a bit more honey. If it’s too sweet, add more vinegar. - Use fresh ingredients: Fresh juice and herbs can brighten the flavor. They make the dressing taste better and fresher. - Experiment: Try using different vinegars or juices to find your perfect mix. A vinaigrette works well with many dishes. Here are some ideas for pairing: - Fresh salads: Drizzle it over mixed greens, spinach, or kale salads. - Grilled veggies: Toss it on grilled vegetables for added flavor. - Cold grains: Use it in quinoa or pasta salads for a zesty kick. For a simple and tasty recipe, check out the Full Recipe for Zesty Citrus Vinaigrette Dressing! {{image_2}} You can easily boost your vinaigrette's taste by adding herbs and spices. Fresh herbs like basil, parsley, or dill create a bright flavor. Dried herbs, such as oregano or thyme, work well too. A pinch of red pepper flakes adds a nice kick. You can also try garlic or shallots for depth. Seasoning with a bit of mustard gives it a nice tang. All these additions help you customize the vinaigrette to your taste. Changing the acid in your vinaigrette can change its whole vibe. Instead of apple cider vinegar, try balsamic vinegar for a sweeter taste. White wine vinegar offers a light flavor. If you love citrus, lemon or lime juice gives a fresh zing. Each acid adds its unique twist, making each vinaigrette special. You can mix and match to find your favorite combo. If you want a vegan option, swap honey for maple syrup. Maple syrup offers a sweet flavor that works well in vinaigrettes. You can also use agave nectar for another sweet option. Both choices keep the dressing plant-based while still tasting great. This simple switch makes your vinaigrette suitable for everyone. You can enjoy the same great taste while being kind to all diets. For the full recipe, check out the Zesty Citrus Vinaigrette Dressing! To keep your vinaigrette fresh, store it in a clean glass jar. A jar with a tight lid works best. Make sure to let the vinaigrette cool if you made it warm. Always shake the jar before using. This helps mix the ingredients well. Your homemade vinaigrette can last up to two weeks in the fridge. After that, the taste may change. Look for signs like separation or odd smells. If it looks or smells off, it’s best to toss it. Don’t waste any leftover vinaigrette! You can use it in many ways. Drizzle it over grilled veggies or use it as a marinade for chicken. You can even mix it into cooked grains like quinoa or rice for extra flavor. Get creative and enjoy those delicious flavors! For a full recipe, check out the Zesty Citrus Vinaigrette Dressing. Homemade vinaigrette can last up to two weeks in the fridge. To keep it fresh, store it in a sealed jar or bottle. Always shake or stir before using, as it may separate over time. If you notice any strange smells or changes in color, it’s best to toss it out. Yes, you can use various vinegars for this recipe. Some great options are balsamic, red wine, or white wine vinegar. Each type of vinegar adds a unique flavor. Try mixing and matching to find your perfect taste. Just remember to balance the acidity with your other ingredients. Absolutely! This vinaigrette is perfect for meal prep. Make a batch and store it in the fridge for quick meals. You can use it on salads, grains, or even as a marinade. Just remember to shake it well before each use. You’ll have delicious dressing ready anytime! For the complete recipe, check the full recipe section. This vinaigrette recipe is easy and fun to make. We mix fresh orange juice, vinegar, and mustard for a bright base. Adding olive oil gives it a creamy texture, while honey and lemon zest boost the flavor. Don't forget your herbs for extra taste! Store any leftovers properly to keep them fresh. This vinaigrette pairs well with many salads and dishes. With these tips, you can impress your family and friends. Enjoy your homemade dressing!](https://toastedrecipes.com/wp-content/uploads/2025/07/cd66a927-e6bc-4c32-b034-06c4bec2822b.webp)
Easy Vinaigrette Salad Dressing Flavorful and Fresh
Are you ready to take your salads from bland to brilliant? This Easy Vinaigrette Salad Dressing is packed with flavor and freshness. With simple ingredients
![- 1 can of refrigerated biscuit dough (8 biscuits) - 1/2 cup pizza sauce - 1 cup shredded mozzarella cheese - 1/4 cup sliced pepperoni - 1/4 cup diced bell peppers - Fresh basil leaves - 1/4 teaspoon dried oregano - Salt and pepper to taste Gathering the right ingredients is key for making delicious mini biscuit pizzas. You start with refrigerated biscuit dough, which serves as the base. This dough is soft and puffs up nicely in the oven. Next, you need pizza sauce. It adds that classic pizza flavor. I recommend using a store-bought sauce to save time, but homemade works too! Then, grab shredded mozzarella cheese. It melts perfectly and gives that gooey texture kids love. For optional toppings, consider sliced pepperoni. Kids enjoy the savory taste. Diced bell peppers add a nice crunch and a pop of color. Fresh basil leaves can brighten the dish and offer a fresh taste. Finally, don’t forget the seasoning! A sprinkle of dried oregano, salt, and pepper enhances the flavor. By using these ingredients, you can create fun and tasty treats that kids will adore. For the complete instructions, check the Full Recipe. First, we need to preheat the oven to 375°F (190°C). This step warms the oven, so your mini pizzas bake evenly. While the oven heats, grab the can of refrigerated biscuit dough. Open it carefully. Place the biscuits on a baking sheet. Use your hands or a rolling pin to flatten each biscuit into a small disc about 1/2 inch thick. This will create a nice base for your mini pizzas. Now, it’s time to add flavor! Spoon about one tablespoon of pizza sauce onto each biscuit. Spread it evenly across the surface. Next, sprinkle a generous amount of shredded mozzarella cheese on top of the sauce. Cheese is the star of the show! Add a few slices of pepperoni and diced bell peppers if you want extra veggies. Finally, sprinkle a pinch of dried oregano, salt, and pepper over each mini pizza. This will enhance the flavor beautifully. It’s baking time! Place the baking sheet in the oven and bake the flattened biscuits for about 10 minutes. Keep an eye on them. You want them to just start turning golden. Once they’re ready, remove the biscuits from the oven and let them cool for a minute. Now, return the baking sheet to the oven for an additional 5-7 minutes. This time, watch for the cheese to become bubbly and golden. When they are done, let them cool for a minute before serving. You can garnish with fresh basil leaves for a lovely touch. Enjoy your fun and tasty Mini Biscuit Pizzas! For more detailed steps, check the Full Recipe. Using fresh ingredients is great for flavor. However, canned ingredients also work well for quick meals. Store leftover toppings in airtight containers in the fridge. You can use these toppings later for another meal. To flatten the biscuits, use your hands or a rolling pin. Aim for a thickness of about 1/2 inch. This ensures even cooking. To get that perfect cheese melt, bake the mini pizzas until the cheese is bubbly and golden. Keep an eye on them! Serve mini pizzas on colorful plates. Kids love fun shapes, so consider cutting them into triangles or fun designs. Let your kids help with the toppings. They will enjoy being part of the cooking process. This makes mealtime more exciting! {{image_2}} You can have fun with toppings on your mini biscuit pizzas. For a vegetarian option, try adding fresh veggies. Some great choices are: - Sliced mushrooms - Spinach - Zucchini - Cherry tomatoes These toppings not only taste good but also add color. Kids love colorful food! For unique flavor combinations, think outside the box. How about barbecue sauce with chicken and red onion? Or, try pesto with mozzarella and sun-dried tomatoes. You can even make a breakfast pizza with scrambled eggs and cheese! Biscuit dough is great, but you can also switch it up. Use crescent roll dough for a flaky crust. You can even make your own dough if you want. If you need gluten-free options, look for gluten-free biscuit mixes. They work well and taste just as good. Kids won’t even know the difference! Pizza sauce is classic, but you can explore other sauces. Try pesto for a fresh twist or barbecue sauce for a sweet taste. You can make your own sauce too. Blend canned tomatoes with garlic, basil, and a pinch of salt. This homemade sauce is easy and yummy. Store-bought sauces are fine too, but making your own adds a personal touch. Check out the Full Recipe for more ideas! To keep your mini biscuit pizzas fresh, store them in an airtight container. This helps maintain their taste and texture. Place a piece of parchment paper between layers to prevent sticking. You can keep them in the fridge for up to three days. When reheating, use an oven or toaster oven for the best results. Preheat it to 350°F (175°C) and warm the pizzas for about 5-7 minutes. This keeps the crust crispy and the cheese melty. You can freeze mini biscuit pizzas before baking. After you assemble them, place them on a baking sheet. Freeze them for about an hour, then transfer to a freezer bag. This way, they won’t stick together. To bake frozen pizzas, preheat your oven to 375°F (190°C) and add a few extra minutes to the baking time. This ensures they cook through while still being delicious. In the refrigerator, mini biscuit pizzas last for about three days. Check for signs of spoilage, like a sour smell or mold. If you see any, it’s best to throw them away. Always trust your senses to keep your food safe. Explore the full recipe for more fun ideas! You can swap out some ingredients to make these mini pizzas healthier. Here are a few ideas: - Use whole wheat biscuit dough instead of regular. - Choose low-fat cheese or a dairy-free alternative. - Add more veggies like spinach, mushrooms, or zucchini. - Use homemade pizza sauce with less sugar. - Skip the pepperoni or use turkey pepperoni for a leaner option. These swaps keep the fun and taste while adding more nutrition. Kids will love them just the same! Yes, you can prep Mini Biscuit Pizzas in advance! Here’s how: - Prepare the biscuits and flatten them. - Bake them for the first 10 minutes and let them cool. - Store the baked biscuits in an airtight container in the fridge for up to two days. - When you're ready to serve, add the sauce and toppings, then bake for 5-7 minutes. This makes for a quick meal on busy days! If you want to switch up the sauce, there are many tasty options: - Use pesto for a fresh, herby flavor. - Try barbecue sauce for a sweet and tangy twist. - Spread hummus for a creamy and different taste. - Use Alfredo sauce for a rich, cheesy base. These alternatives can add a fun spin to your Mini Biscuit Pizzas! For the full recipe, check here: [Full Recipe]. In this article, we explored how to make mini biscuit pizzas using simple ingredients like refrigerated biscuit dough, pizza sauce, and cheese. We covered steps for preparation and baking, along with tips for storage and variations. Remember, you can mix and match toppings to make your pizzas unique. Mini biscuit pizzas are perfect for quick meals or fun cooking activities. Enjoy getting creative in the kitchen! These easy recipes will bring smiles to all, whether you’re sharing with family or hosting friends.](https://toastedrecipes.com/wp-content/uploads/2025/07/b456e780-5923-42b6-9fa3-1d180e94b81a.webp)
Mini Biscuit Pizzas for Kids Fun and Tasty Treats
Looking for a fun and easy snack for your kids? Mini biscuit pizzas are the perfect solution! With just a few simple ingredients, you can

Bento Box Lunch That Delivers Flavor and Freshness
Are you ready to take your lunch game to a whole new level? A bento box is your delicious solution. Packed with flavor and fresh
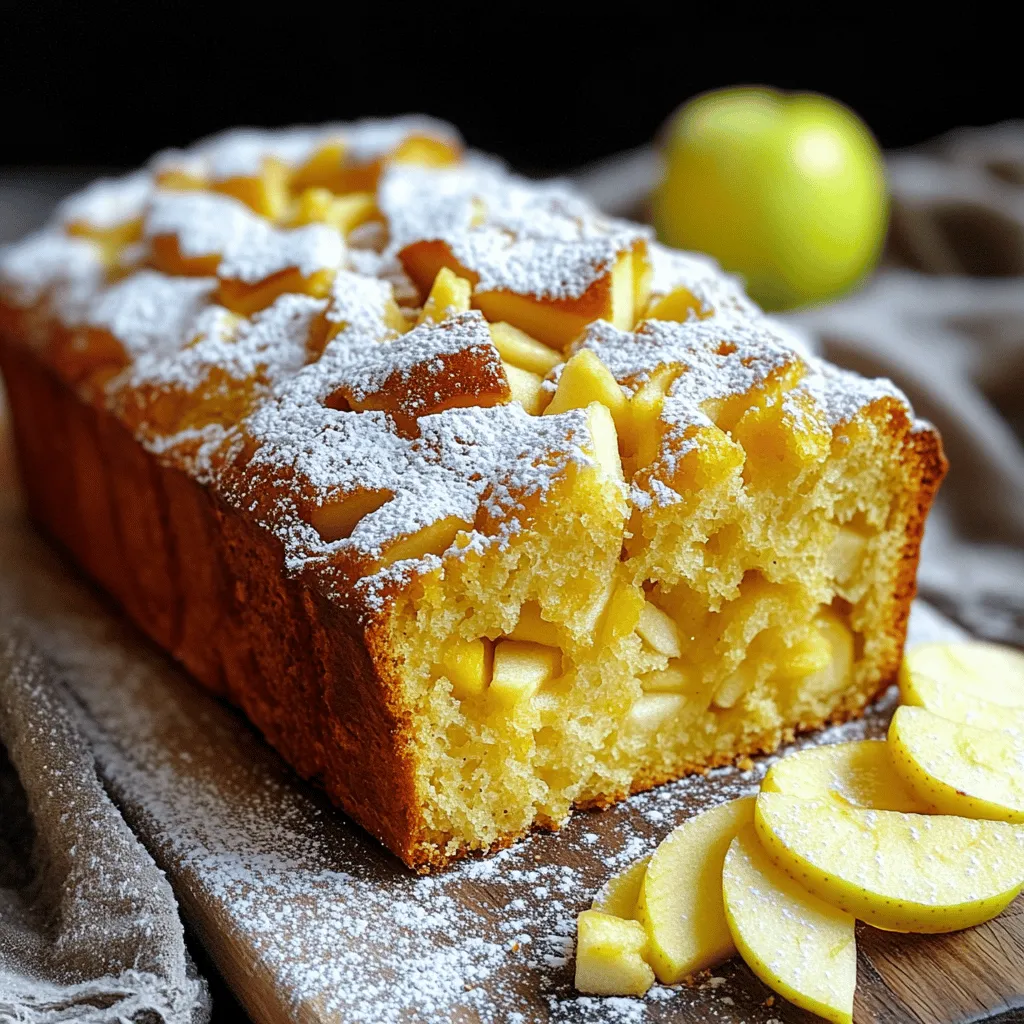
Country Apple Fritter Bread Delightful and Easy Recipe
Are you ready to savor the warmth of homemade Country Apple Fritter Bread? This delightful recipe combines tender, spice-kissed apples with a soft, sweet bread